Caramelize Onions in 15 Minutes Flat [Video]

By Alan Henry, LifehackerAugust 31, 2012 at 08:00AM


Caramelizing onions is a process that can take well over an hour, even though many recipes conveniently omit that fact from their prep time estimates. Thankfully, the folks over at Serious Eats came up with a method that gets the job done in a fraction of the time, and all you need is a little tap water.

If you’ve ever caramelized onions, you know it can take well over an hour of watching and stirring as the onions cook down. This method however, gives you the same results, and all you have to do is pay close attention and keep some water handy:

As you can see, the key is good stirring and temperature regulation. I use a heavy Le Creuset enameled cast iron pot, which is great at transferring heat slowly and evenly, preventing the hot and cool spots that are the bane to good caramelization (a tri-ply stainless steel saucepan would also work well). Every time the fond (that’s the browned bits of sugars and proteins that stick to the bottom of the pot) threatens to burn, I add a few tablespoons of water and use a wooden spoon to scrape the bits up. The browned sugars and proteins end up dissolving in the water then spread themselves evenly around the onions.

Kenji does note that the catch here is that the resulting onions aren’t quite as cooked down and tasty as they would be if you spent an hour poring over them, but he says they’re 90% of the way there, and still better than cheats like adding sugar or baking soda to speed up the process, and saves a lot of time in the kitchen.

How to Caramelize Onions in 15 Minutes | Serious Eats

What Is the Windows 7 Reliability Monitor And How to Get The Most Out Of It

By Ryan Dube, MakeUseOfAugust 30, 2012 at 10:30PM

How do you know when a computer is reliable? How exactly do you even define something as abstract as “reliability”.

When I think about what makes my computer reliable, in my opinion it is all about whether or not the computer can run the applications that I need it to, without any sort of lagging, freezing up or crashing. When an application suddenly crashes on me without any explanation, or with nothing more than some odd Windows error code, I start to get concerned. Is my computer infected with a virus or malware? Why can’t it run a program that normally runs under any other Windows PC?

This is essentially how Microsoft decided to define “reliability” as well. In fact, embedded into Windows 7 is a useful reliability monitor that lets you not only visualize the current reliability level of your computer, but you can also see a historic log of  how reliable your computer has performed over time.

How can you see the reliability of your computer? Well, Chris recently covered using a tool to research windows software error reports. This is a great tool to research current software errors you may be experiencing, but the beauty of this tool is that it also serves as a historic log and research tool for your Windows 7 reliability level over time.

Monitoring Your Windows Reliability

Why should you care about your past reliability? Isn’t it only today that really matters? Well, not really.

Sometimes patterns can reveal a whole lot about how your computer may be infected without you even realizing it.  An infection may not cause your computer to come to a screetching halt, but it may cause a background service to crash every few days. But, by monitoring your reliability history, you’ll be able to spot those patterns and shut down malicious software before it can do any damage.

To use the reliability monitor on your Windows 7 machine, go into the Control Center and make sure “View by” is set to “Category”. Click on “System and Security” and then under “Action Center”, click on “Review your computer’s status and resolve issues”.

Click on “Maintenance” to expand that section, and then click on the link to “View reliability history”.

Now you’re in the reliability monitor tool. This is a very large chart that will range over approximately a month at a time. It shows you how your reliability level has fared on a daily basis from week to week. You’ll notice that as each day passes without a Windows or Application crash, or without any system failures, your overall reliability rating continues to climb. The goal is obviously to have a perfect 10.

The tool logs application failures, windows failures, miscellaneous failures, system warnings and even informational notifications. When you click on each day, you’ll see the actual details of those alerts and notifications in the lower display pane.

The category of alerts are displayed in the monitor with a unique icon. This gives you a quick glance at what level of event occurred on that day and how serious any problems were. You may notice that on some days the notifications had no effect on the reliability index – the error was not serious enough for the index to get lowered. However, on other days you’ll notice that one application crash drops your overall reliability by nearly 30 to 50 percent.

It all comes down to what caused the crash and why. In the detail pane, you can investigate some of those serious failures that caused a huge drop in reliability. The “Summary” field gives you a brief explanation of what happened, but to see more details you can click on “View technical details”.

For example, I noticed that at least every 3 or 4 days, MotoConnect.exe was crashing. This isn’t even an application that I use anymore – it was a version of the driver for the Motorola Droid that I installed back in 2010. The Description will tell you a lot of information about the application that crashed, right down to the dll file that faulted.

Certainly, there’s a newer version of the Motorola driver software. Sure enough, on the Motorola site I discovered a much newer driver called Motorola Mobility that can replace this older version that’s driving my system reliability down with its constant crashing.

The lesson to learn from this is that it’s not always a virus or malware that can make your system unreliable. Sometimes it might just be an outdated service that keeps crashing in the background and you may not even realize it, because it doesn’t kick off any active alert windows. However, the reliability monitor can help you spot those background issues you may not normally be aware of. Sometimes, fixing those background crashes can improve the overall performance of your computer.

Another thing that can affect performance and reliability is whether your computer is properly up to date and patched. In the process of analyzing my reliability log, I noticed a constant warning message popping up about every week. Clicking on the alerts, I learned that there was a list of about 10 critical Microsoft patches that were failing to install automatically.

I thought that was odd, so I checked my Windows Update icon in the task bar and upon opening it up, sure enough there were a number of updates waiting to install. To fix this constant, ongoing problem just required a quick manual install of the critical updates, and voila – I ensured that my long-term reliability level for my computer would increase over the next few weeks.

By the way, the daily log is also a great place to go to see not only “bad” events that take place on your computer, but also any other activity that might occur, like software installations.

If you work in IT, this can be a real life-saver when you’re trying to figure out what a user did on a computer that made it start crashing constantly. Did they recently install or uninstall an application? You can see it all here by date and time. This is an awesome IT troubleshooting tool.

If you want to get to the most serious issues causing problems for your computer, go after those huge drops that kill your reliability in one fell swoop.

Typically, you’ll see a critical event that occurs on a recurring basis. Fix that one issue and you’ll go a long way in improving your overall computer reliability.

As you can see, the reliability monitor has a lot of uses for troubleshooting and monitoring a lot about your computer. If you make it a regular habit to launch the monitor and review any recent issues, you’re sure to keep your computer running at it’s top possible performance.

Did you already know about the reliability monitor before reading this article? Is this the first time you’ve seen it? Does it seem like something you will use to maintain your computer? Share your thoughts and insights in the comments section below.

Image Credit: stock diagram via Shutterstock

FindTheData Compares Tons of Data Side-By-Side, Is a Research Gold Mine [Search]

By Melanie Pinola, LifehackerAugust 30, 2012 at 12:30PM

FindTheData Compares Tons of Data Side-By-Side, Is a Research Gold MineFindTheData is an incredibly cool tool for comparing all kinds of information—from job salaries to auto fuel economy to celebrities’ heights and weights. The webapp parses data from all kinds of public databases and other sources to deliver all these facts.

FindTheData is part of the FindTheBest family of comparison sites. While FindTheBest compares dozens of categories to help you make better decisions (e.g., pick the best college), FindTheData is more of a research/reference tool.

Once you browse to or find the datapoint you want to compare (e.g., libraries, hurricanes, or serial killers), you can filter the search results, select individual items to compare side-by-side, and see more in-depth details.

Fair warning: It might be hard to stop browsing the databases, especially if you’re a trivia buff.

FindTheData

All Fireworks Should Look as Spectacular as This [Image Cache]

By Adrian Covert, GizmodoAugust 29, 2012 at 06:40PM

We’ve all seen pictures of fireworks before, but never have they looked this amazing. Captured by refocusing he shot during a long exposure, the explosions are almost 3D in appearance. They look as much like sea urchins made of clay as they do pyrotechnics. Shot by photographer Davey Johnson, the appeal of these photos is immediate. But the more you stare, the more you find to like. [Davey J via Colossal] More »


TSA Declares Themselves Fashion & Funny Police

By Timothy Geigner, Techdirt.August 29, 2012 at 01:33PM

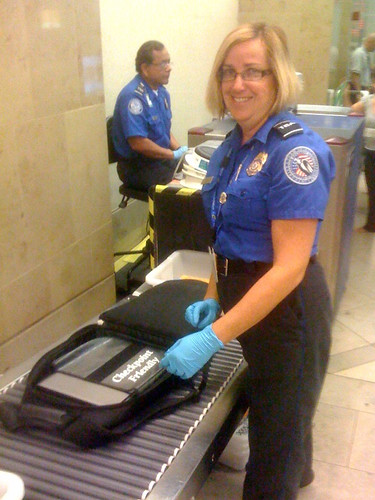
While we were just discussing an accusation against the TSA for racial profiling (GASP!), did you know that they were also the official state-sponsored fashion and humor police? I mean, who couldn’t see these guys adjudicating your local fashion show?


TSA uniforms: like Michael Jackson, but creepier
Image Source. CC BY-SA 2.0

Reader pixelpusher220 writes in about the tale of how one man’s shirt got him booted off of a Delta airplane after passing through TSA security, as recounted by Cory Doctrow.

Back in 2007, I designed a shirt for Woot! that featured a screaming eagle clutching an unlaced shoe and a crushed water bottle, surrounded by the motto MOISTURE BOMBS ZOMG TERRORISTS ZOMG GONNA KILL US ALL ZOMG ZOMG ALERT LEVEL BLOODRED RUN RUN TAKE OFF YOUR SHOES. Among the lucky owners of this garment is Arijit “Poop Strong” Guha, who proudly wore it this week as he headed for a Delta flight from Buffalo-Niagara International Airport to his home in Phoenix.

But it was not to be. First, the TSA Delta agents questioned him closely about the shirt, and made him agree to change it, submit to a secondary screening and board last. He complied with these rules, but then he was pulled aside by multiple Niagara Frontier Transportation Authority cops, more TSA, and a Delta official and searched again.


Apparently the new terror plot is to make you laugh so hard your face explodes


It’s worth noting that these shirts were designed by Cory Doctrow and sold as part of a charitable program.

Now, I’ll restate it again, Arijit had already gone through the TSA screening when he and his wife were then approached by Delta employees at the gate who informed him that he had committed the crime of making other passengers “uncomfortable”. When Arijit informed the Delta employees that he was wearing the shirt specifically to mock the security theater we call an airport these days, he was put through another round of screening at the gate by several TSA and local agents and then told that he would be allowed to board. The Delta pilot, catching wind of this, requested Arijit not be allowed to board, because laughter would not be tolerated on his enormous hunk of flying metal. Oh, and they also refused to allow his wife to board the plane too. No reason was apparently given for this, but I’m guessing there may have been some plaid mixing with pin-stripes in her outfit, and the pilot found it to be lacking in fabulousness.

Or maybe there was another reason. According to Arijit, the officer wanted to interrogate him further, saying that Arijit had given a “stupid answer” and “looked foreign”:

“Certainly he wasn’t implying that dark-skinned people are not real Americans and that white people are the only true Americans,” Arijit writes in part of his snark-filled synopsis. “Fortunately, Mark’s request was denied. Apparently, someone at NFTA recognized this bigoted meathead for the bigoted meathead he was and that nationality is simply a concept that exists solely on paper and cannot be discerned from just looking at someone.”

And yet he still wasn’t allowed on the plane. Was it because of his t-shirt? Was it because the motherfucking eagle on it caused concern amongst passengers? Or, as has been previously accused, was it because too many TSA agents find brown-skinned people suspicious and alarming?

Permalink | Comments | Email This Story


How to Run Mac OS X on Any Windows PC Using VirtualBox [Video]

By Whitson Gordon, LifehackerAugust 28, 2012 at 11:00AM


Even if you’re a Windows fan, you’ve probably thought about trying OS X. Maybe you’d like to test drive OS X before switching to a Mac or building a Hackintosh, or maybe you just want to run that one killer OS X app on your Windows machine. Whatever your reason, you can actually install and run OS X inside your existing Windows setup with a program called VirtualBox. Here’s how.

Running OS X on your Windows desktop will take a bit of work, but it’s pretty easy to do and the final product is awesome. To see what the whole setup will look like when you’re done, check out the video above. Then, head to the instructions below to set it up for yourself.

What You’ll Need

Before you start the installation process, you’ll want to gather the following:

  • A PC running 64-bit Windows with at least a dual-core processor and 4GB of RAM. Mountain Lion is 64-bit, and thus requires your copy of Windows to be 64-bit. If you’re on a 32-bit version of Windows, you can install Snow Leopard instead. For more info, check out the difference between 32-bit and 64-bit operating systems.
  • VirtualBox and the VirtualBox Extension Pack: VirtualBox is our favorite virtualization tool for Windows, and it’s completely free. VirtualBox doesn’t officially support OS X, but it’s actually very easy to get up and running. You should download the main program and the Extension Pack, which will give you support for USB devices.
  • A hacked Mountain Lion disc image. Sadly, this won’t work with a vanilla Mountain Lion installer, so you’ll have to find a compatible hacked version. The hacking group Olarila has put a great installation ISO together, and you can find it by searching Google. If that doesn’t sit well with you, you can head over to the Mac App Store and buy a legit copy for yourself, so you can at least pirate with a clear conscience.
  • The HackBoot 1 and HackBoot 2 ISO files. These will help you boot into the installation.
  • MultiBeast 4, which will help you get audio and other things working correctly after installation. You’ll need to register for a free account over at Tonymacx86.com to download this. Make sure to download MultiBeast 4—it’s labeled “Lion”, but for our purposes the Lion version works better than the Mountain Lion version.

Step One: Install and Set Up VirtualBox

Before we install OS X, we’ll need to set up VirtualBox so the OS X install disc can boot correctly. Here’s what you need to do:

  1. Start up VirtualBox and click the New button. Give your new virtual machine a name (I just called it “Mac OS X”) and set the operating system to “Mac OS X Server (64-bit)”.How to Run Mac OS X on Any Windows PC Using VirtualBox
  2. Click Next and choose how much RAM to give your virtual machine. This depends on how much RAM is in your system—you can get away with 2GB, but if you have more, give it more. 4GB of RAM should be a good amount, though I gave mine 6GB since I had RAM to spare.How to Run Mac OS X on Any Windows PC Using VirtualBox
  3. Click Next again, and choose “Create New Disk”. Create your new disk in VDI format and with dynamically allocated storage. When you’re done, VirtualBox should take you back to the main screen.
  4. From here, right-click on your OS X machine in the left sidebar and click Settings. Go to the “System” section and uncheck “Enable EFI”.
  5. Click on the Storage section of the settings and click on the CD icon that says “Empty” under Storage Type. Then, click the CD icon next to the “CD/DVD Drive” dropdown, and select “Choose a Virtual CD/DVD Disk File”. Choose the HackBoot 1 ISO and click OK.How to Run Mac OS X on Any Windows PC Using VirtualBox

Now, your machine is ready to boot for the first time. Make sure you have your Mountain Lion ISO ready to go and proceed to the next step.

Step Two: Install OS X in VirtualBox

The next step involves actually installing OS X to your new virtual machine. When you’re ready, start up VirtualBox and follow these instructions:

  1. Select your OS X machine in VirtualBox’s left sidebar and click the Start button in the toolbar. It’ll bring you to the HackBoot boot screen, with one icon in the middle labeled HackBoot.How to Run Mac OS X on Any Windows PC Using VirtualBox
  2. Click on the CD icon at the bottom of the VirtualBox window and select “Choose a Virtual CD/DVD Disk File”. This time, choose your hacked Mountain Lion ISO.
  3. Go back to the HackBoot boot screen and press F5. It should reload the boot menu, this time showing you an “OS X Install DVD”. Select this option and press Enter. After a moment, it’ll take you to the OS X Installation screen.
  4. After you choose your language and agree to the terms and conditions, you’ll see that OS X doesn’t detect any valid hard drives. To fix this problem, head up to the menu bar and go to Utilities > Disk Utility.
  5. Click on your VirtualBox hard drive in the left sidebar, then click the Erase tab in Disk Utility’s main pane. Give your drive a name (like “Macintosh HD”) and click “Erase”.How to Run Mac OS X on Any Windows PC Using VirtualBox
  6. Once Disk Utility has finished formatting your drive, you should see it show up in the left sidebar. When you do, exit Disk Utility and continue with the OS X installation as normal.

The rest of the installation should be pretty self-explanatory, and should go off without a hitch. It took me about 20 minutes to install OS X. When it finishes, it’ll take you to a black screen with white text. At this point, you can click the “X” in the upper-right corner of the window to power off the virtual machine.

Step Three: Smooth Out the Rough Edges

You’re almost there! You’ve installed OS X, but you’ll still need to tweak a few things to get audio and graphics working properly. Here’s what you need to do.

Fix Audio with MultiBeast

  1. Open up VirtualBox and right-click on your OS X virtual machine in the left sidebar. Head back to its Settings and go to the Storage section. Once again, click on the disc icon on the right side of the window, this time choosing the HackBoot 2 ISO.
  2. Click the Start button to reboot your virtual machine. You should see the HackBoot menu again, this time with an option to boot into your new virtual machine. Select that option and press Enter.How to Run Mac OS X on Any Windows PC Using VirtualBox
  3. After a minute, you should see the Mountain Lion desktop with the familiar galaxy wallpaper. Open up Safari, head to Tonymacx86.com, and download MultiBeast as described in the “What You’ll Need” section.
  4. Open up System Preferences > Security. Click the lock in the bottom left-hand corner, enter your password, and set the “Allow Applications” preference to “Anywhere”. This will let you run apps from untrusted developers, which includes Multibeast.
  5. Launch Multibeast. When you get to the Installation Type section, Choose the options pictured below:How to Run Mac OS X on Any Windows PC Using VirtualBoxClick continue and finish the Multibeast installation. It may take a few minutes.

Your audio won’t work just yet, but we have a few other things we need to do before we restart.

Boot OS X Without HackBoot

In order to boot OS X without the HackBoot CD, we’ll need to delete a problematic kext. You can do this through the following steps:

  1. Open up the Finder and select Go > Go to Folder from the menu bar. Type in /System/Library/Extensions and press Enter.
  2. In this folder, find the AppleGraphicsControl.kext file and delete it. This will allow your virtual machine to boot up without the HackBoot ISO.How to Run Mac OS X on Any Windows PC Using VirtualBox
  3. Click on the disc icon at the bottom of VirtualBox’s window and uncheck the HackBoot 2 ISO, since you won’t need it anymore.

Get Higher Resolution Virtual Machine

Lastly, you’ve probably noticed your VM is running at a pretty low resolution. That’s totally lame, so we’re going to make it run at the same resolution as our monitor with a few tweaks. To do so, just:

  1. Head back to Go > Go to Folder and go to /Extra/. Double-click on the org.Chameleon.boot.plist file and add the following to the bottom of the file, above the </dict> line:
    <key>Graphics Mode</key>
    <string>1920x1080x32</string>

    Save the file and close TextEdit. This allows OS X to start up with a higher resolution. Note that you can set whatever resolution you want; just replace 1920x1080 with the resolution you want.

  2. If the resolution you picked is bigger than 1280×1024 and/or is widescreen, you’ll need to do one last thing to get it working properly. Shut down your virtual machine and open Windows’ Command Prompt. Type the following commands, hitting enter after each one:
    cd “C:\Program Files\Oracle\VirtualBox”
    vboxmanage setextradata “MyVirtualMachine” “CustomVideoMode1” “1920x1080x32”

    Replace the first line with the path to your VirtualBox program folder. In the second line, replace MyVirtualMachine with the name of your machine (in our case, “Mac OS X”), and 1920x1080x32 with the same resolution you added to your Chameleon plist.

How to Run Mac OS X on Any Windows PC Using VirtualBox

When you’re done, restart your OS X virtual machine and you should be greeted with a full-res desktop and working audio! You can now continue to install your favorite apps, set up your keyboard and mouse, and do anything else you like. You’ve got a fully working virtual Mac on your Windows desktop!

How I cracked my neighbor’s WiFi password without breaking a sweat

By Dan Goodin, Ars Technica » Risk AssessmentAugust 28, 2012 at 10:46AM

The four-way handshake, in which a wireless device (STA) validates itself to a WiFi access point and vice versa.

Last week’s feature explaining why passwords are under assault like never before touched a nerve with many Ars readers, and with good reason. After all, passwords are the keys that secure web-based bank accounts, sensitive e-mail services, and virtually every other facet of our online life. Lose control of the wrong password and it may only be a matter of time until the rest of our digital assets fall, too.

Take, for example, the hundreds of millions of WiFi networks in use all over the world. If they’re like the ones within range of my office, most of them are protected by the Wi-Fi Protected Access or Wi-Fi Protected Access 2 security protocols. In theory, these protections prevent hackers and other unauthorized people from accessing wireless networks or even viewing traffic sent over them, but only when end users choose strong passwords. I was curious how easy it would be to crack these passcodes using the advanced hardware menus and techniques that have become readily available over the past five years. What I found wasn’t encouraging.

First, the good news. WPA and WPA2 use an extremely robust password-storage regimen that significantly slows the speed of automated cracking programs. By using the PBKDF2 key derivation function along with 4,096 iterations of SHA1 cryptographic hashing algorithm, attacks that took minutes to run against the recent LinkedIn and eHarmony password dumps of June would require days or even weeks or months to complete against the WiFi encryption scheme.

Read 13 remaining paragraphs | Comments